Wednesday, March 28, 2012

Asparagus Gruyere Tart

Asparagus Gruyere Tart


Ingredients

  • Flour, for work surface
  • 1 sheet frozen puff pastry
  • 5 1/2 ounces (2 cups) Gruyere cheese, shredded
  • 1 1/2 pounds medium or thick asparagus
  • 1 tablespoon olive oil
  • Salt and pepper

Directions

  1. Preheat oven to 400 degrees. On a floured surface, roll the puff pastry into a 16-by-10-inch rectangle. Trim uneven edges. Place pastry on a baking sheet. With a sharp knife, lightly score pastry dough 1 inch in from the edges to mark a rectangle. Using a fork, pierce dough inside the markings at 1/2-inch intervals. Bake until golden, about 15 minutes.
  2. Remove pastry shell from oven, and sprinkle with Gruyere. Trim the bottoms of the asparagus spears to fit crosswise inside the tart shell; arrange in a single layer over Gruyere, alternating ends and tips. Brush with oil, and season with salt and pepper. Bake until spears are tender, 20 to 25 minutes.

Cook's Note

Store-bought puff pastry works well in this savory tart; thaw it according to package instructions. Emmentaler or Fontina cheese can be substituted for the Gruyere.

*****I got this from the Martha Stewart Website that I LOVE!!!!*****  Go over and check out other Yummy Appetizers!!!! There is also a Video on how to make this HERE on her website! :o) Thanks Martha!

Monday, March 26, 2012

DIY {GLITTER HEELS}

DIY {GLITTER HEELS}

Ralph’s Birthday is coming up and I don’t want to miss a Step! I Love to celebrate and make Holidays special so I found the perfect dress months in Advance! The problem I always have is I buy Heels to match my outfits…Not getting to Break them in leads to a painful night. I own lots of heels but my Dress is REALLY pink so I wanted to do a subtle black high heel but add a pop of Color! I love Christian Louboutin and the whole idea of a hidden color underneath. I have a Tiffany Charm bracelet with a charm high heel with the signature Tiffany blue adorned underneath. So why do the colors have to stop there?? I want Glittery Pink Party Shoes!! 

I recently went to ACMoore and picked up a package of Martha Stewart Glitter that I have been using on my nails…You can check them out HERE


What you will need:
A pair of heels
Glitter
Clear Glue
Tape ~So you can keep the outer part of your heel clean
A Foam Brush our your finger to spread the glue.

As you noticed I left the bottom part Black...I didn't bother because it will come off anyway and when the heel is flat you don't see that part :o)

     Be sure to do this over a piece of paper, outside or over a sink…it can get messy . Also allow an adequate amount of time to dry. Do Not attempt an hour before you go out! It will be all over everything (I know this because I did it with my nails!!) I could only imagine the damage to wet glitter heels would do. You will also need to lock in the glitter with a clear glaze top coat so the glitter will not come off when it gets wet! Good Luck Ladys….Happy Fabulous Feet!!! Feel free to send me your picks of your revamped heels…I would be happy to add them!! :o) 

You can also Follow me on Pinterest for Blog Updates HERE :o) 


Wednesday, March 21, 2012

Early

So I'm tuning out...I'm usually up late like 10-11ish Ralph on the other hand is in bed by 9! Yes, he gets up super early (I do too...but were talking 4am verse 6am) I hate not falling asleep at the same time...So I'm Headed to bed early tonight ;) I guess we could all use some extra sleep once in a while. 

I'm surprised that we don't have a power outage in our bedroom....Here are the things we need in order to fall asleep at night..

*Two Fans on....One on my side and the ceiling fan
*Humidifier with Vick's Vapors "Calming"Aroma
*Brookstones {Nature Sounds} 
*iphones charging & ipads charging
*Heated blanket

(Also Windows open)

                                              Basically One Big "White Noise Maker" 

Our Future babies will probably have to sleep with all this calming white noise as well....Because it knocks our Dogs out for the entire night...We literally have to drag them out of bed in the Morning...They would sleep till 11am if we never woke them!


Here's to an early sleep and a Beautiful 80* day tomorrow...Whoa Life is Good!


                                               ****"ARE YOU COMING" ~RV

"Yes...Just turning off the tree" *lie* but Really Goodnight Y'all 


                                    Note to self: Don't forget to turn off the tree! 


PINK

I LOVE LOVE LOVE PINK!!!! I will continue to Add all things PINK to this Post, so stayed tuned :o)

 You can Follow me on Pinterest HERE   To get Recent Blog Updates :o) 

                                                                   Bridges park - Ireland.


I would love to have this next to Ralph's Red one!! Hmmm Maybe I could store my craft Supplies in it?!?! Or I could put the Pink Tool Set my mom bought!! :o)

                Needless to say I NEED THIS!!!
                                                                   I love it
                                                                                I want it

Sunday, March 18, 2012

It's that Time

It's Official...Spring is Here and Summer is around the Corner. We had such a nice weekend, It was Anthony's Birthday so we all headed out to Pinelli's for Dinner on Friday night. Crystal bought T the best cake...Totally suiting "Harley Davidson"! We enjoyed some Amazing Italian food and Laughed the night away.


Saturday Ralph and I had to bring the Dogs to the Vet for Check-Ups and whatnot so we were up bright and early, Samuel Preston had to get a Lyme Vaccination so we all headed home to Relax for the day. That night Ralph and I rented movies and got into our PJ's early...Cuddled on the couch, Love!

 Today was absolutely beautiful, we opened up all the windows in the house and did some serious Spring cleaning...Not much to "spring clean" because we just moved recently but more so unpack (the little things we never got around too) and organize. I can't stop telling Ralph how great today was...I made Homemade Lemonade from scratch and Ralph was in the drive way washing his Truck and Harley. I went to Whole Foods to pick up some grocery's and we took the dogs on the walking path. Tonight we had a chicken dinner on the Grill and made the most absurdly delicious Banana Dessert known to man!!


I saw these over on "Lick My Spoon" a super cute Blog with Insanely Yummy Recipes!!

You Can Follow Me On  Pintrest HERE  :) Or Click Subscribe to your Right... To get recent Blog updates :)

Banana Boats


Prep Time: 5 minutes
Cook Time: 10 minutes

Ingredients
Bananas (As many as you need. Estimate 1 per person. Once they taste it, no one will want to share.)
Chocolate chips, butterscotch, peanut butter chips, mini marshmallows, sweetened coconut (Or whatever other toppings you fancy.)
Foil

Preparation
  1. Choose your bananas. I personally like mine ripened until perfectly spotted. I think they are sweeter this way.
  2. Slit the bananas lengthwise.
  3. Stuff them with any combination of toppings you desire. I am a big fan of dark chocolate and butterscotch.
  4. Wrap the \'nanas in foil and place on the grill. Grill with the cover on until toppings get melty and delicious.
  5. Eat with a spoon. (Insanely good over ice cream).
                                                          ~~~Happy Birthday Anthony~~~

This week's Project.... Have I told you I LOVE Mason Jars...Ok I LOVE MASON JARS!! I think they are so flippen awesome. I use them for Craft Projects, I made Glow Jars, Candle Jars and even store different kinds of Rice in my Pantry in them. When I saw this I knew I would have to do it.....
The Salad stays good for 6-7 Days...Unfortunately I don't like Lettuce, Tomatoes or anything else that goes in a Salad HaHa ya can you believe it..I can! But Ralph does. For me I will Make Fruit Jars and Ralph Salad Jars. Wishing it wasn't so late on Sunday or I would be off to the Craft store to pick up some more Jars!! Excited to do this!! 


I Love BBQ's!!! This Summer I will be sure to have an Outdoor Smore's Bar....check this out...


Saturday, March 17, 2012

Cilantro Green Chile Penne

Happy St.Patty's Day Y'all!!!!!
 
Ralph and I are not Irish nor are we fans of Boiled Dinners...Especially Corned Beef and Cabbage...In Fact the very thought of it makes me and him gag! I still wanted to do something festive and "Green" I love to celebrate Every Holiday!! So tonight we will be having a pasta and chicken dish...Take a peek.
 
 
Cilantro Green Chile Penne


Ingredients
  • cooked penne pasta- 1 lb
  • cilantro- 1 bundle
  • diced green chiles- 3 7oz. cans DO NOT DRAIN
  • queso fresco cheese- 1 round
Instructions
  1. boil pasta in salted water, drain and return to pan
  2. pull leaves from cilantro and place in blender
  3. add green chiles with juices to blender
  4. add about 3/4 of cheese to blender
  5. blend together on medium speed until sauce forms, but do not over-blend
  6. pour sauce over cooked penne and heat until bubbly, just a few minutes
  7. serve garnished with remaining crumbled cheese

Glitter Nails

 I have not Raved enough about Martha Stewart. I Love Her! I love her Craft line, Cooking line, Dog line...You name it I have it or want it! All the products are high quality, even my dogs cant tear through her dog toys! My heart literally Flutters when I open up the Mailbox and see a new issue of her "Living" magazine. I know that night I will have a Long Hot Bath, Ice Cold water, indulge in a few Godiva chocolates and Read my Living Magazine! (Not to mention all subscribers can get it on their ipads free with their subscription. So today I decided to do something a little different. I bought a package of Martha Stewart Glitter for a couple of Easter Projects....but now I'm thinking I may need another package. These will definitely be going on my Magnetic Pedi/Mani Board Love Love Love the look of this....Y'all have to try it!!!! 

For More DIY you can follow me HERE :)
      I Purchased the Glitter at AcMoore and my Ring is from Nordstrom :o)


                                        Now for Todays Hairdo....I'm going to attempt to do this....We will see! 

Thursday, March 15, 2012

Lucky Charm Parfaits

With St.Patty's day a few days away I felt compelled to buy LUCKY CHARMS...Yes the inner child in me was screaming when I approached the Cereal isle. So I brought it Home and immediately got to creating. I made Lucky Charm Cupcakes and Lucky Charm Parfaits.....These may be my Favorite YUM! Vanilla Pudding with Green food coloring, Lucky charms, a frosting rim and Whip Cream!! Delicious  
                                                            
.

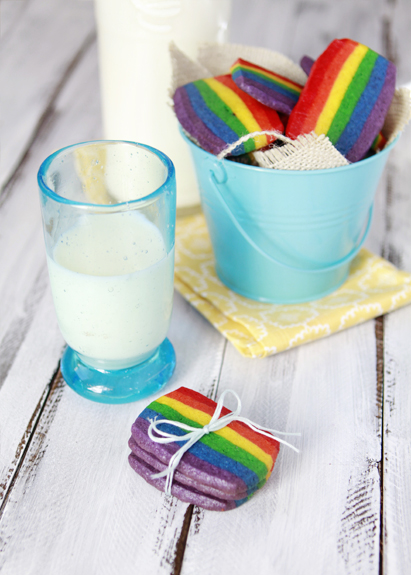
Tonight's project is testing out Sugar Cookie Rainbow's.............

                        I found this over at Good Life Eats and I just LOVE it....They look Super Cute and I'm really starting to get into the St.Patty's Day mood. Can't believe it will be here on Saturday Whoa! Take a Peek at these....


Ingredients:

1 1/2 cup unsalted butter
2 cups sugar
2 whole eggs
2 whole eggs yolks
4 teaspoons vanilla extract
2 teaspoons almond extract
4 cups all-purpose flour
1 teaspoon salt
1 teaspoon baking powder

Directions:

In the bowl of a stand mixer, combine the butter and sugar and beat well, for about 2 minutes. Add the whole eggs and 2 yolks, continuing to mix until combined. Stir in the vanilla extract and vanilla.

In a medium bowl, combine the flour, salt, and baking powder and whisk until sifted. Add the flour mixture to the butter mixture about 1 cup at a time, stirring with the paddle attachment (not the whisk) to incorporate each cup. Do not over mix.

Divide the dough into six equal portions - it helps if you have a kitchen scale for this. Using gel food coloring (gel works so much better for vibrant colors than standard food coloring), color each layer a color of the rainbow. I used a hand mixer to combine the color in with each dough section and then rinsed the bowl and beaters before moving on to another color.

Place dough in individual ziplock bags or saran wrap and refrigerate until firm, about an hour or two. One at a time, roll colors into approximately 6x9 inch rectangles. Refrigerate each layer after rolling, and then add subsequent layers on top in rainbow color order.

When all layers have been stacked, trim edges for a neat rectangle. Wrap again in saran wrap and freeze until very firm. Slice strips across the 6 inch side about 1/4 inch thick and cut each strip in half. Place cookies on a parchment lined cookie sheet and freeze again (this helps minimize spreading).

When you are ready to bake, heat oven to 350 degrees. Roll dough out, cut out cookies, and bake for 6-10 minutes. Cool on the cookie sheet for a few minutes before transferring to a wire rack. Cool the cookie sheet in between baking each batch.

Leftover dough can be stored in the freezer for a few weeks.


Wednesday, March 14, 2012

No Sew Fleece

We recently found out we are Having a BABY GIRL!!! So I joined Top Baby Blogs and would be over the Moon if you would take two seconds, (Really just TWO I promise) by clicking the link below then clicking the first Owl!! You are Awesome!! Thank You, Hope you enjoy your No Sew Blankets :) 


Click To Vote For Us @ the Top Baby Blogs Directory! The most popular baby blogs


We Love blankets in this house...My Dogs especially. So today's Project was Two blankets for my puppy's and One for Me. I have one started for Ralph but as you can imagine he didn't want Zebra!!  It took me about 45 minutes to make all three!! This was the easiest projects I have ever done. You only need fleece cut to the size you want, tape measure, and scissors! 

You can follow me on Pinterest HERE for More DYI Blog Updates or Subscribe to the Right to get E-mail Updates :o) Spring Projects Coming Soon :o) 

Things You'll Need
  • 2 pieces of fleece, 2 yards each for adult throw...You can really do any size you desire
  • Scissors
  • Clothes Pins if you are making a big one and need it to stay on the table while cutting. I did mine on the floor and it worked just fine :o) 
  •  Tape Measure


Instructions   
    • 1
Lay the two pieces of fleece out of your work surface -- one on top of the other, with right sides facing out.
    • 2
Pin the pieces together, staying at least 4 inches away from the edge.


    • 3
Cut off the selvage edges or the whip-stitched edges, if you're using two ready-made blankets, with sharp fabric scissors.
    • 4
Cut a 4-inch square from each corner. Cut through both layers of fabric.
    • 5
Cut 4-inch long strips into the perimeter of the blanket, leaving an inch between cuts.
    • 6
Tie each strip from the top piece of fleece to the corresponding strip from the bottom piece of fleece to create a fringed edge. Work your way around all four sides to complete your no-sew fleece blanket.


Monday, March 12, 2012

Magnetic Cork Planters

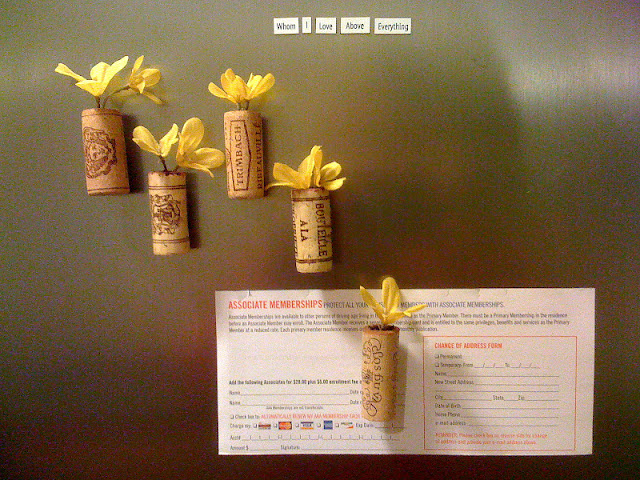
These are just the cutest things ever and Sooo Easy to make, It literally took me ten minutes....I took a couple of Corks and had Ralph drill a hole in the top...Filled it with soil and planted a couple of seeds! Put some Hot glue on the back with my glue gun and placed a magnet on the back. I'm super impatient and couldn't wait for the real flowers to sprout so I put some fake ones in there until Spring really arrives. :o) 

****Sorry all my pictures have been "Grainy" on my Blog this week....my Canon is Broken :/ Shipping it out this week to hopefully fix it...If not off to Best Buy I go! :o) 

You can hit Subscribe to the Right for Daily Blog updates or Follow me on Pinterest for more DIY Projects HERE  :)


This is just to show you that they do hold up things. The magnets are strong...Although my Refrigerator is bare...I don't like anything on it... Except for the side...Which is where these little cork magnets will go... I actually put them on my Dinner Menu Board :o) Actually I just lied...I bought these cute little poem magnets at Barnes and Noble and Ralph pulled them out one day and left me a Poem on the Front of the Fridge and I seriously cannot take it down....LOVE! But other than that it's bare. ;)

CHECK OUT My Magnetic Dinner Board HERE :)


Related Posts Plugin for WordPress, Blogger...